Building a 60% keyboard: a DZ60 build guide
Published 17 February 2018
Ever built your own keyboard before?
Well, up until a few months ago, I didn't even know that it was possible. I've been using a mechanical keyboard at work for nearly two years now - a Ducky Zero with Cherry MX Blue switches that I've quite liked - but it was only recently that I got sucked into the mechanical keyboards subreddit where users show off all kinds of weird and wonderful keyboard designs and layouts. Soon enough, the urge hit me to try and build an awesome-looking keyboard of my own!
The Why
Well, for starters, it's not to save money. My keyboard has cost me about the same as my Ducky Zero, but depending on what parts you buy, you could easily spend triple what I have.
Rather, it's all about the customisation! By building your own keyboard, you can choose every detail, including:
-
Switch type (Blues? Browns? Reds? Or more exotic choices like Kailh's "burnt orange"?)
-
Key Layout (Do you want an arrow cluster? Split spacebar? Ortholinear?)
-
Case Type/Colour (Plastic? Wooden? Aluminium?)
-
Keycaps (Standard black? Two-tone colours? Rainbow?)
The best bit is that not only can you customise all of these from the start, but you can keep your keyboard fresh by changing up specific parts later on! Feel like a new case? Get a fancy new wooden case! Keycaps getting a little worn? Put on a new set!
My hope is that by building a 60% keyboard I can satisfy the craving for new keyboard styles without having to build a whole new keyboard every time (though I'm yet to see how true this will be).
There *is *one small catch to building your own keyboard, though: some soldering skill is required in order to put all your switches in place on the keyboard's circuit board. For a long time, this really put me off - I've never soldered before and it sounded really tedious and annoying! But once I started to look into various keyboard build videos and soldering tutorials, I realised it actually isn't that hard at all. So, don't let that intimidate you too much!
Prior to building my keyboard, I actually practiced a little bit of soldering with a $15AU electronics kit from Jaycar and a cheap $18AU soldering iron. With the knowledge I'd picked up from watching videos, I was able to do an alright job without a lot of effort.
The Design
Once you decide on building your own keyboard, you have a lot of decisions to make. The main decision is what kind of form factor you'd like: there's everything from your standard tenkey-less keyboards, to "60%" keyboards that sacrifice the navigation cluster for compactness, all the way down to "40%" keyboards that aim to be as small as possible whilst still offering all the functionality of a regular keyboard. (There are also some keyboard designs that are even smaller, but these usually seem to be for the sake of novelty rather than usability)
After some thought, I decided to go for a 60% keyboard using the standard staggered-column layout as opposed to an ortholinear keyboard. Since this would already be my first time building a keyboard using a non-standard form factor, I didn't want to push the boundaries too far, and leave some things for future experimentation.
The Parts
There's several different important parts you need in order to assemble a keyboard, so here are all my selections:
PCB: DZ60
The PCB is the most important part of your keyboard, as it contains all the circuitry to make it actually work! Your choice of PCB will determine a lot of important factors too, such as the size of the keyboard, the layout of your keys, programmability, and more.
Although the GH60 seems to be the most common go-to PCB, recently I'd been seeing a lot of praise for the DZ60, which is a newer PCB that supports a larger variety of layouts, supports programming via the popular QMK toolset, and has built-in RGB underglow for extra flair.
In the end, I picked the DZ60 mainly due to the greater variety of layouts. I really wanted to try a split-spacebar layout: specifically, I wanted a Fn key in the middle of my spacebars so that I can activate my Fn key combinations more easily with one hand.
The DZ60 also comes with options for your plate which holds the key switches more firmly in place over the PCB: one with a 2u left-shift, and another with your standard 2.25u left-shift. I opted for the latter.
Switches: Gateron Browns
I'm no switch connoiseur ' I've only really tried a couple of switch types ' but I'd been hearing a lot of good things about Gateron-brand switches. These switches are functionally equivalent to common Cherry MX switches, but are a good deal cheaper; some people even seem to prefer Gateron switches over Cherry regardless.
I settled on Gateron Brown switches for this build mainly because I like the tactile feel for programming. I didn't opt for clicky Blues because I would like less noise in my oft-quiet room, but also because I thought it would be fun to try a different switch type.
I bought these switches bundled in with my PCB from KBDFans on AliExpress, which was convenient.
Case: Plastic White
We're getting more into aesthetic options now, and plastic cases are the simplest and cheapest of choices to put your keyboard in. Although fancier aluminium cases might look better or feel sturdier, I figured a plastic case would be a good starting point ' after all, even if I decide to upgrade to a more expensive case later on, I've hardly wasted any money on this case.
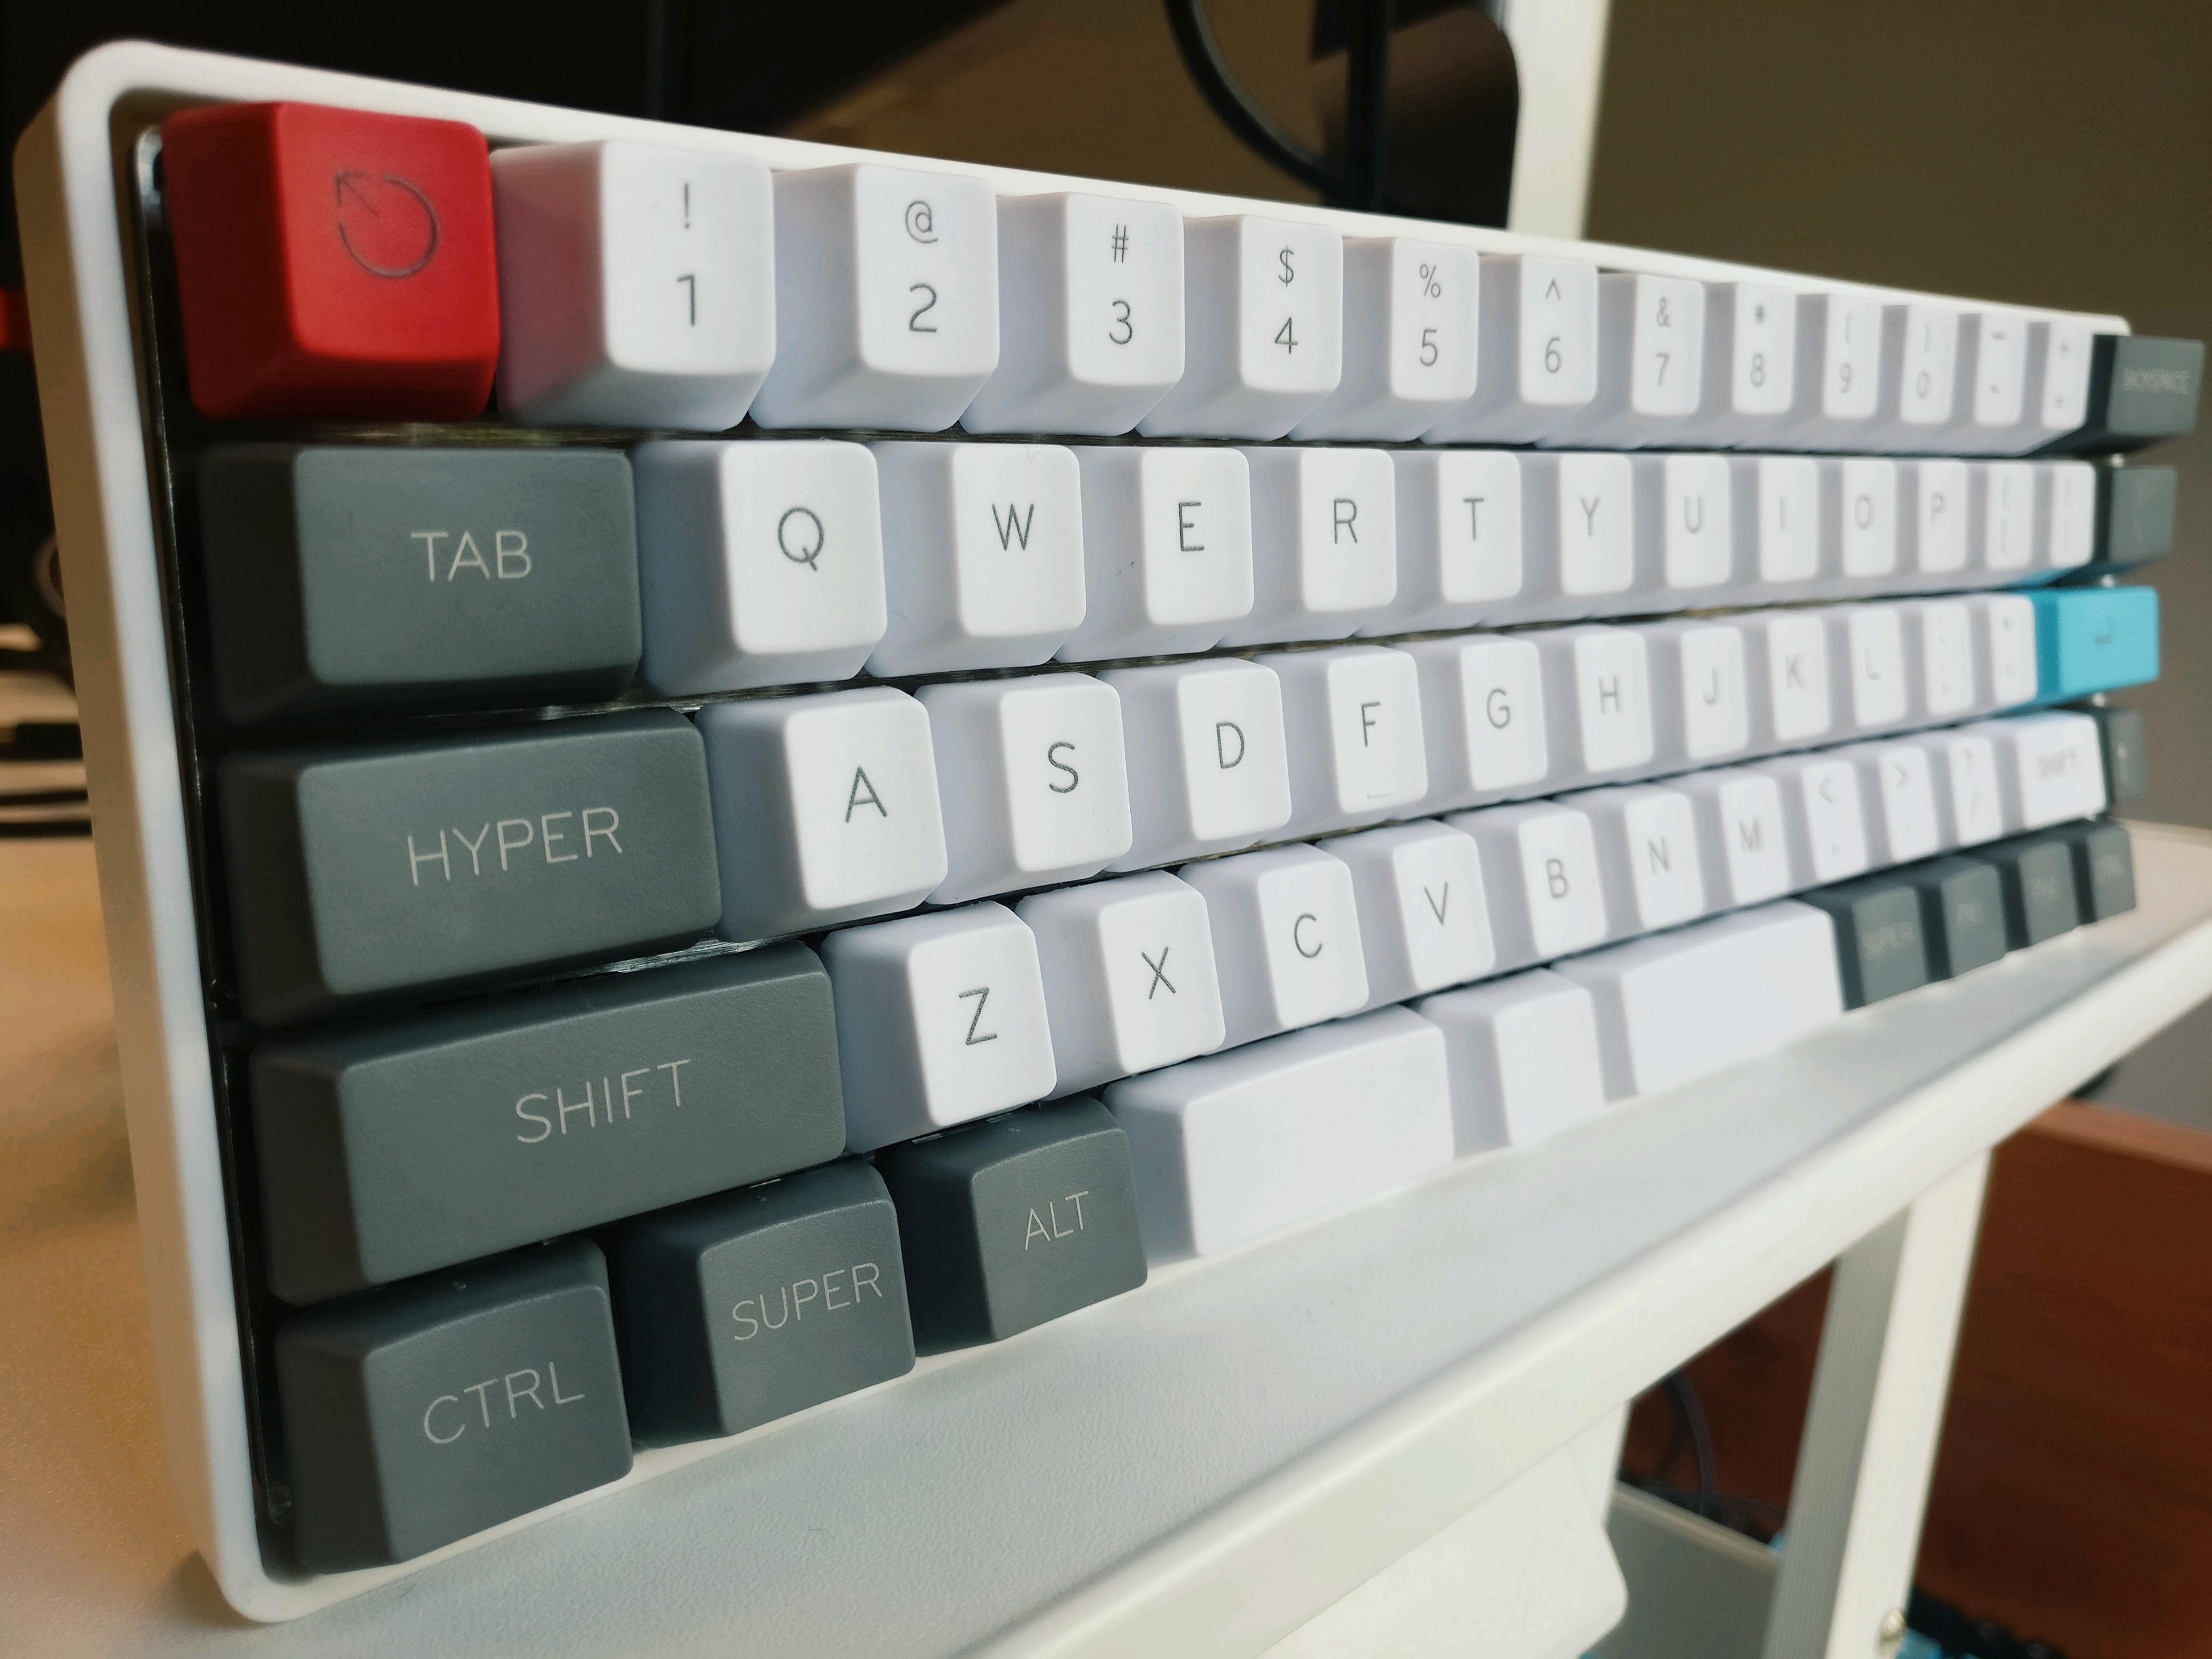
Keycaps: Tai-Hao Aquamarine Cubic Keycaps
The keycaps are arguably the most important choice for determining how your keyboard will actually look! There's so many sets out there with different colour schemes that you're sure to find one you love if you look hard enough. However, some of those nice sets come at a reeeaally steep price, costing nearly as much as my entire keyboard ' or more!
Originally, I ordered this cheap set of PBT keycaps from AliExpress, but those took so long to arrive that a set of Tai-Hao keycaps I ordered off of Massdrop actually arrived earlier, despite an estimated shipping date that was months away! Since I really liked the bright colour scheme of the Tai-Hao Aquamarine keycaps, I was more than happy to just use them instead.
I realised later on that I also needed to purchase some extra blank keycaps for my split-spacebar, since most keysets don't include the extra 3 keycaps that it would require.
Cable: Plain Mini-USB
A lot of people seem to like buying fancy coloured USB cables to match their keyboard, and although I might do that down the track, I figured a plain black cable for $5AU would suit me just fine for my first build!
The Build Process
1. Waiting
Although some of the parts I ordered arrived quite quickly, it took several weeks for everything to come through so that I was actually ready to do the build.
2. Testing the PCB
The very first thing you want to do is test out your PCB to make sure it's working correctly. This way, if something doesn't work when assembled, you can be sure it's because you did something wrong as opposed to a hardware fault!
On the suggestion from the many build videos I'd watched, I plugged in the bare PCB, went to a keyboard tester website, and tested the entire board by touching a pair of tweezers to the solder points for each key, making sure that each registered correctly.
3. Testing the key layout
When building a keyboard with a PCB like the DZ60 that supports a very large number of layouts, it can be quite unclear where the correct soldering points are for the layout that you want to create.
To work out which solder points you actually need to use, it pays to just temporarily slot a couple of switches into the places you think they should go(without soldering them in, of course) and then place your keycaps over the switches to verify whether or not the positioning is correct. If your intended keycaps are too close together to fit (or show large gaps between each other), you'll need to adjust the switch positioning a little until they fit perfectly.
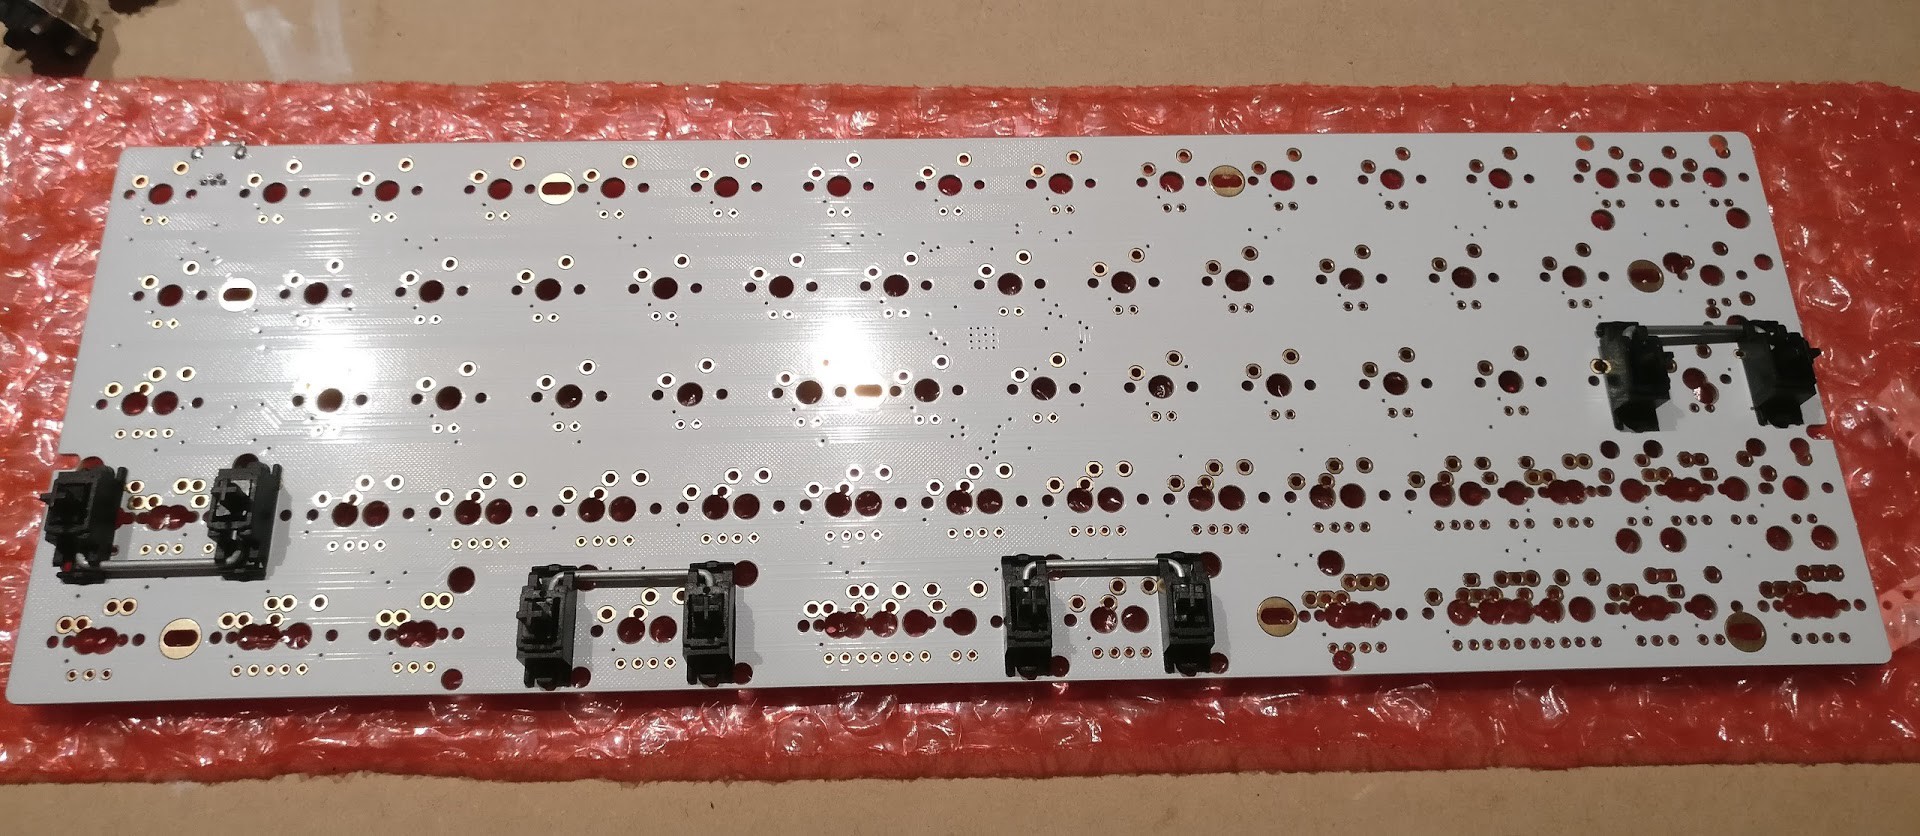
4. Testing the stabilisers
My PCB order included some standard stabilisers which are used over long keys (like the spacebar and Shift keys) to prevent the keycaps wobbling when pressed on their edges. I've heard a lot of complaints online about the quality of stabilisers like these - that they often feel "scratchy" or "mushy" - without really understanding what people mean, so I wanted to place these on the PCB and test them out ahead of time to see if I could tell the difference from my Ducky keyboard.
Mistake #1
It was at this point I realised that, because I was building a split-spacebar layout, I would need an extra two stabilisers for my keyboard; the standard stabiliser sets include four 2u stabilisers plus one long one for the spacebar, but since my spacebar is split over two keys, I would need two extra 2u stabilisers.
Since I'm impatient and didn't want to wait an extra few weeks just for more stabilisers to arrive, I decided instead to see if I could adjust my layout to require only four 2u stabilisers. In the end, I decided not to stabilise the backspace key (which felt just fine to me without a stabiliser) and that, instead of having a large right shift key, I would opt for a 1.75u right shift accompanied by a 1u key.
I placed some keycaps on the stabilisers alongside a switch, and to be perfectly honest, I really struggled to tell the difference in quality. But after pressing it repeatedly for a while, I decided that they did in fact feel kind of stiff, which could impact the typing experience by making the stabilised keys harder to press. So, I took the advice of the internet and tried clipping and lubricating the stabilisers to improve them.
5. Clipping and lubricating the stabilisers
A very common step I saw in many keyboard build guides online was the process of clipping and lubing the stabilisers to make them feel better. "Clipping" just refers to cutting off a small plastic section of the stabilisers, while lubing them simply involves applying a lubricant to the inside of the stabilisers so they can move more smoothly (thus reducing the stiffness I described earlier).
I watched this video to work out exactly which part I needed to clip off, and this other video to make sure I was lubing the correct spots on the stabilisers.
The actual lubricant I used was just some really basic WD40 which I sprayed onto cotton buds in order to apply to the inside of the plastic. I'm not sure if a general-purpose lubricant like WD40 applied with simple cotton buds is a terribly effective way to get this job done, but by this point I really didn't want to delay things any further to go and get something better!
Once this step was done, I'll admit the stabilisers did feel significantly smoother than they did originally. They're still not great, but I was satisfied, at least for my first build.
Update: Since writing, it has been pointed out to me that WD40 is entirely the wrong kind of lubricant to use for stabilisers, so I wouldn't recommend copying what I did here! Instead, I should have used Super Lube or a similar lubricant. That said, I'm still satisfied with how my stabilisers feel, so I'm not too concerned with the error.
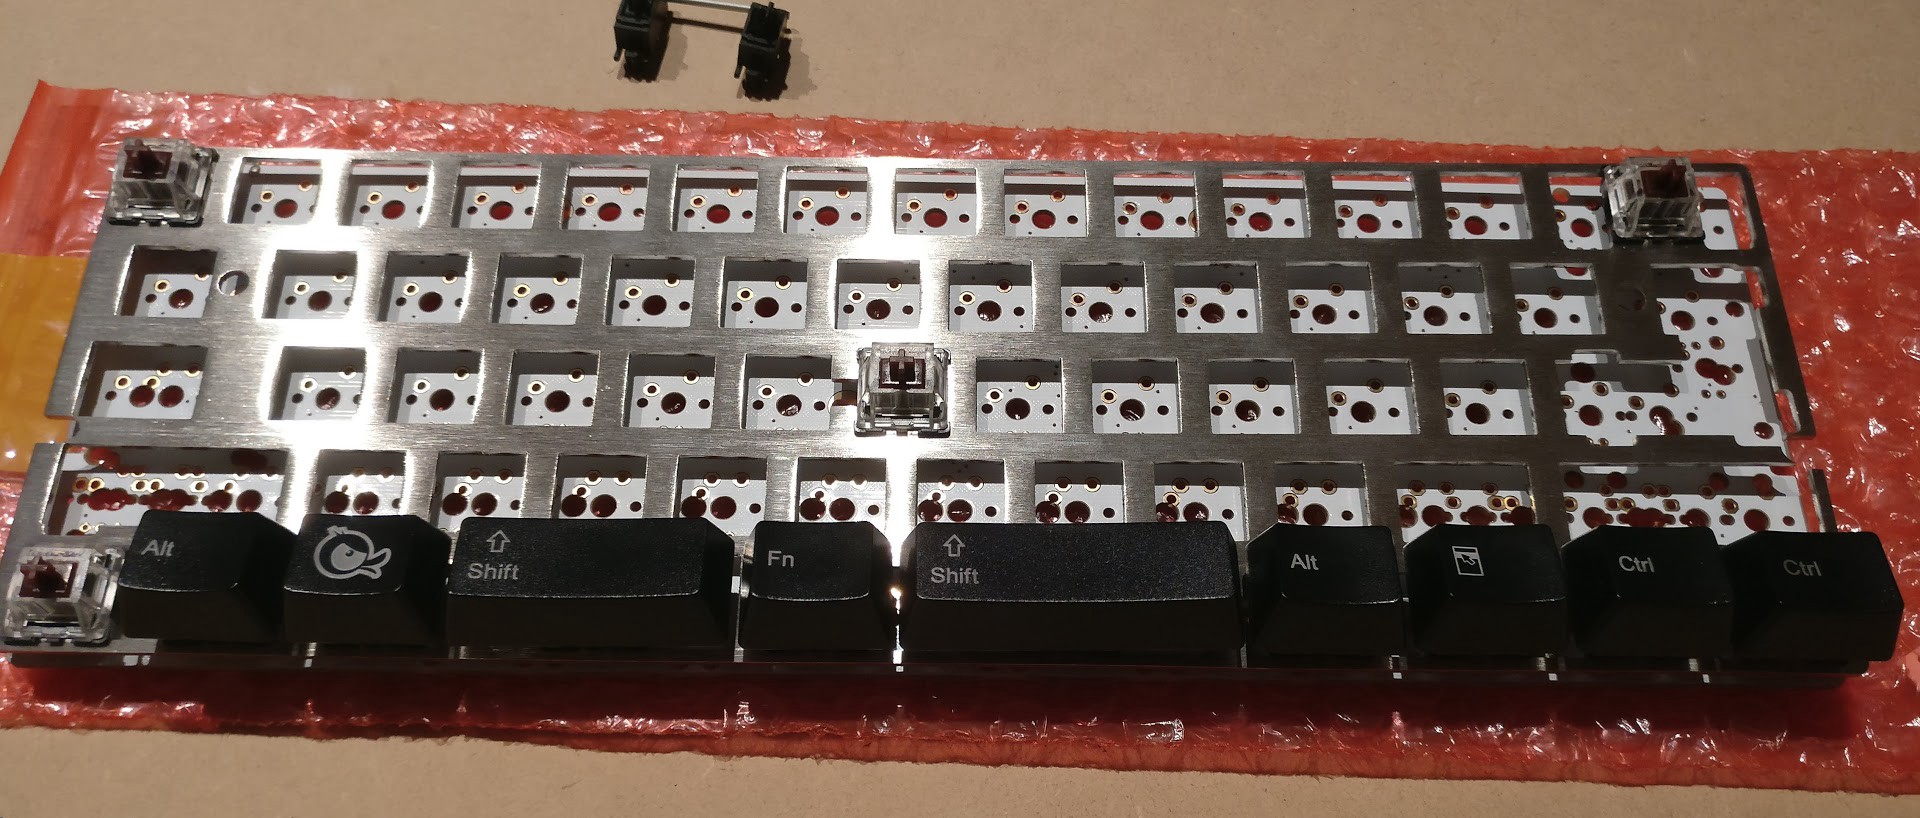
6. Soldering in the switches
This being my first proper attempt at soldering, I took great care with this step. I followed the advice from most build videos to solder in the corner switches first (to anchor the PCB/plate into the correct alignment with an even tension across the board), and then went through the process of soldering in the remaining switches.
Although I got significantly faster with the soldering as I got into a rhythm, a number of interruptions (like some of the screws on my cheap soldering iron coming loose and falling out), this whole step actually took me a couple of hours to do!
All in all, I was fairly happy with my soldering results at the end. My joints were not all perfect but I made no major mistakes and didn't damage the board. I did actually end up with fair bit of unsightly flux residue sitting on the board (pictured below) which I was unable to clean off very well, but I'm led to believe this residue is pretty harmless, and you can't see it on the fully-assembled keyboard anyway.

Once everything was soldered in, I gave the keyboard another test (just like my initial PCB test, but this time pressing the actual switches) to make sure that all the solder joints were working as expected.
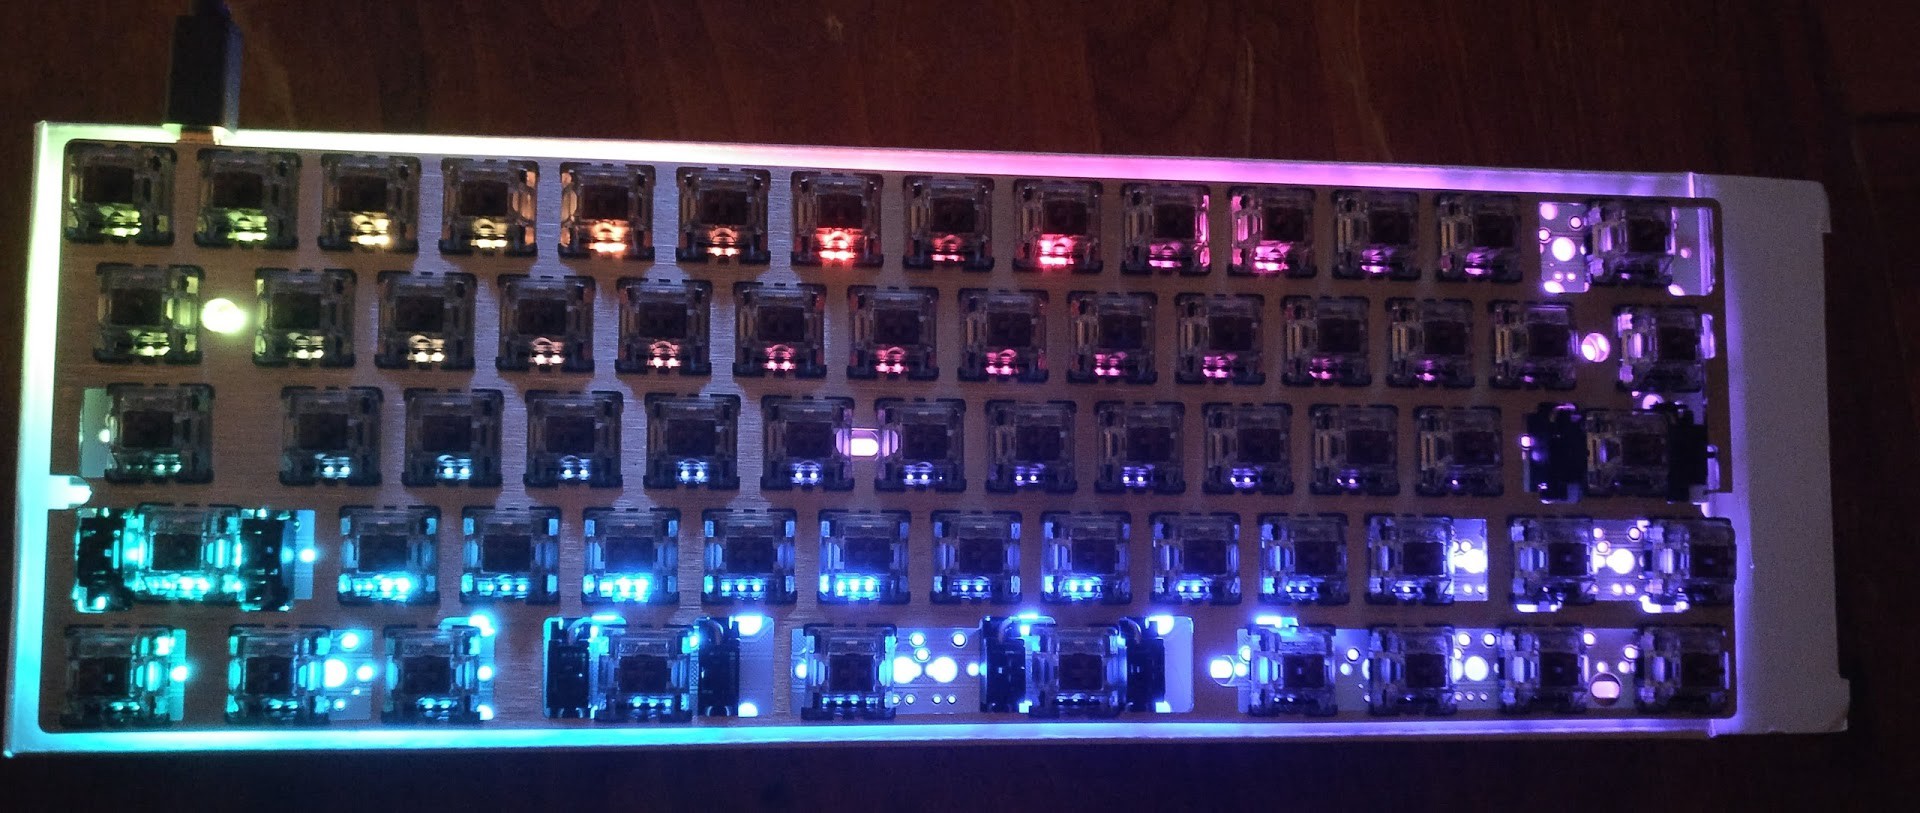
It was at this point that I also realised: although I didn't buy the DZ60 for its underglow feature, the underglow is actually really, really cool!
7. Mounting the keyboard in its case
Putting everything into the case is, thankfully, quite simple. There are multiple mounting holes in the PCB that expose the screw-holes in the case, so all you need to do is screw in each of those points.
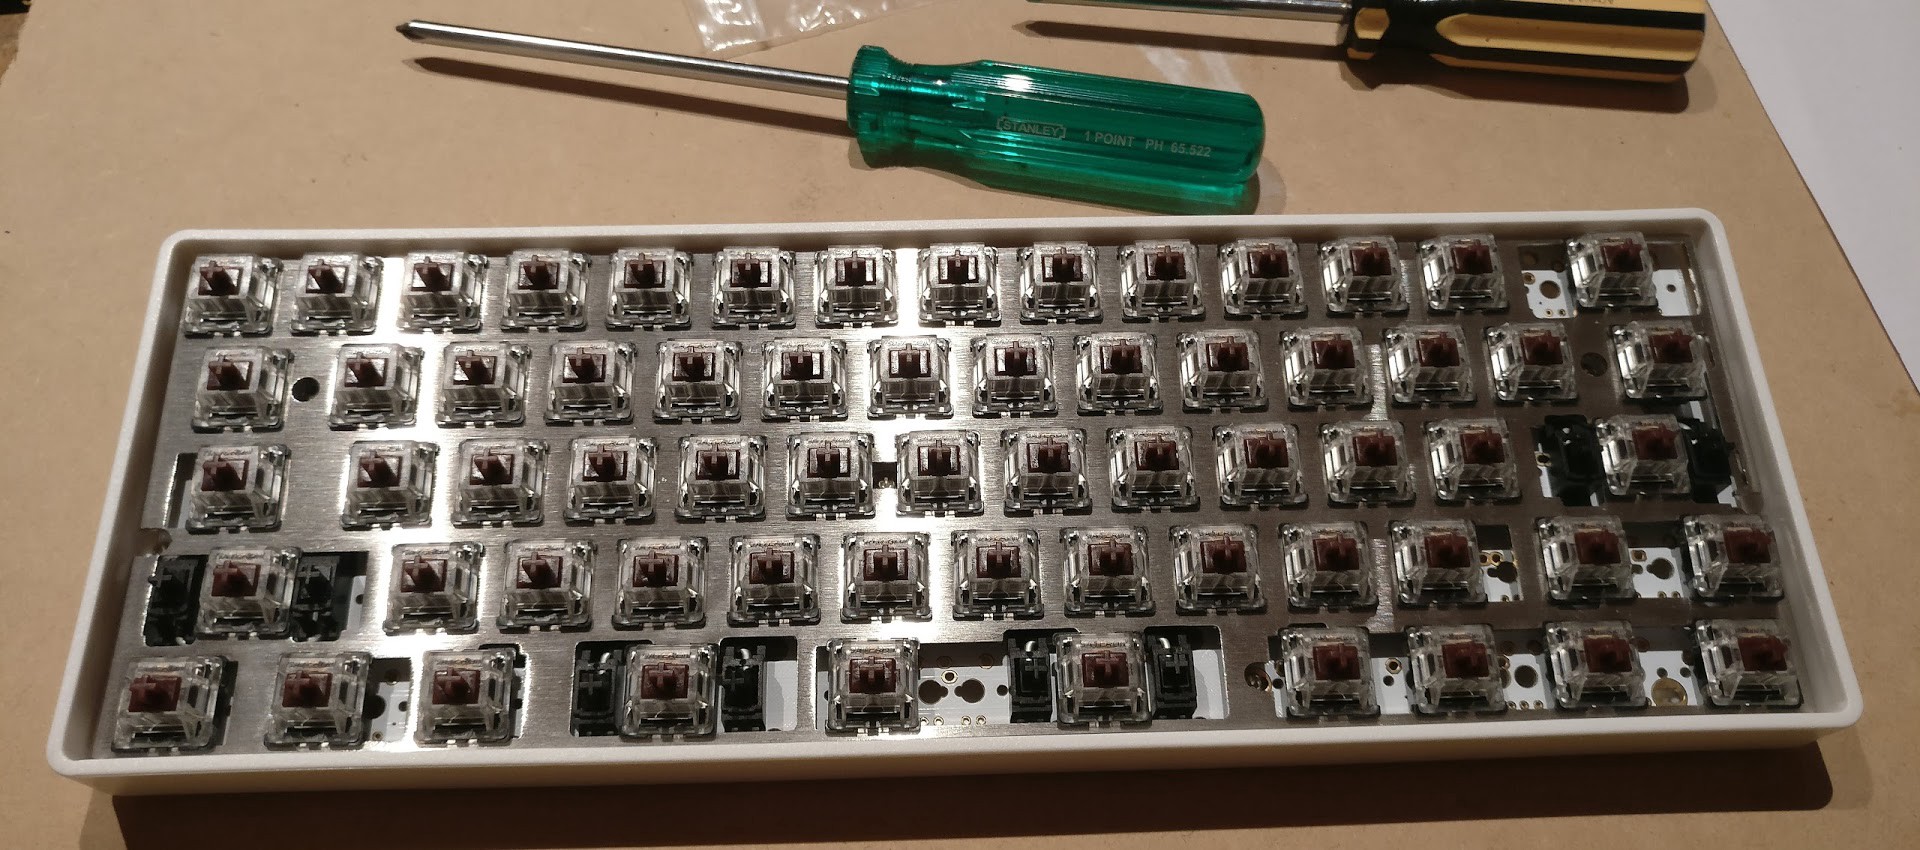
One word of advice: use the thinnest screwdriver you have on hand to screw in each of these points. All of my screwdrivers from the picture above were too fat to easily fit into the gaps between switches for some of the mounting points, which made screwing each point much more tedious than it should be!
8. Adding keycaps!
Now comes what is possibly the most fun part: putting on your keycaps and marvelling at the finished product!
Unfortunately, the keycaps I wanted for this build hadn't arrived when I put everything else together, so I had to use some old and slightly-worn keycaps from my Ducky keyboard. Alas, not only did that make the end result look a little underwhelming, but I found a mistake with my soldering!
Mistake #2
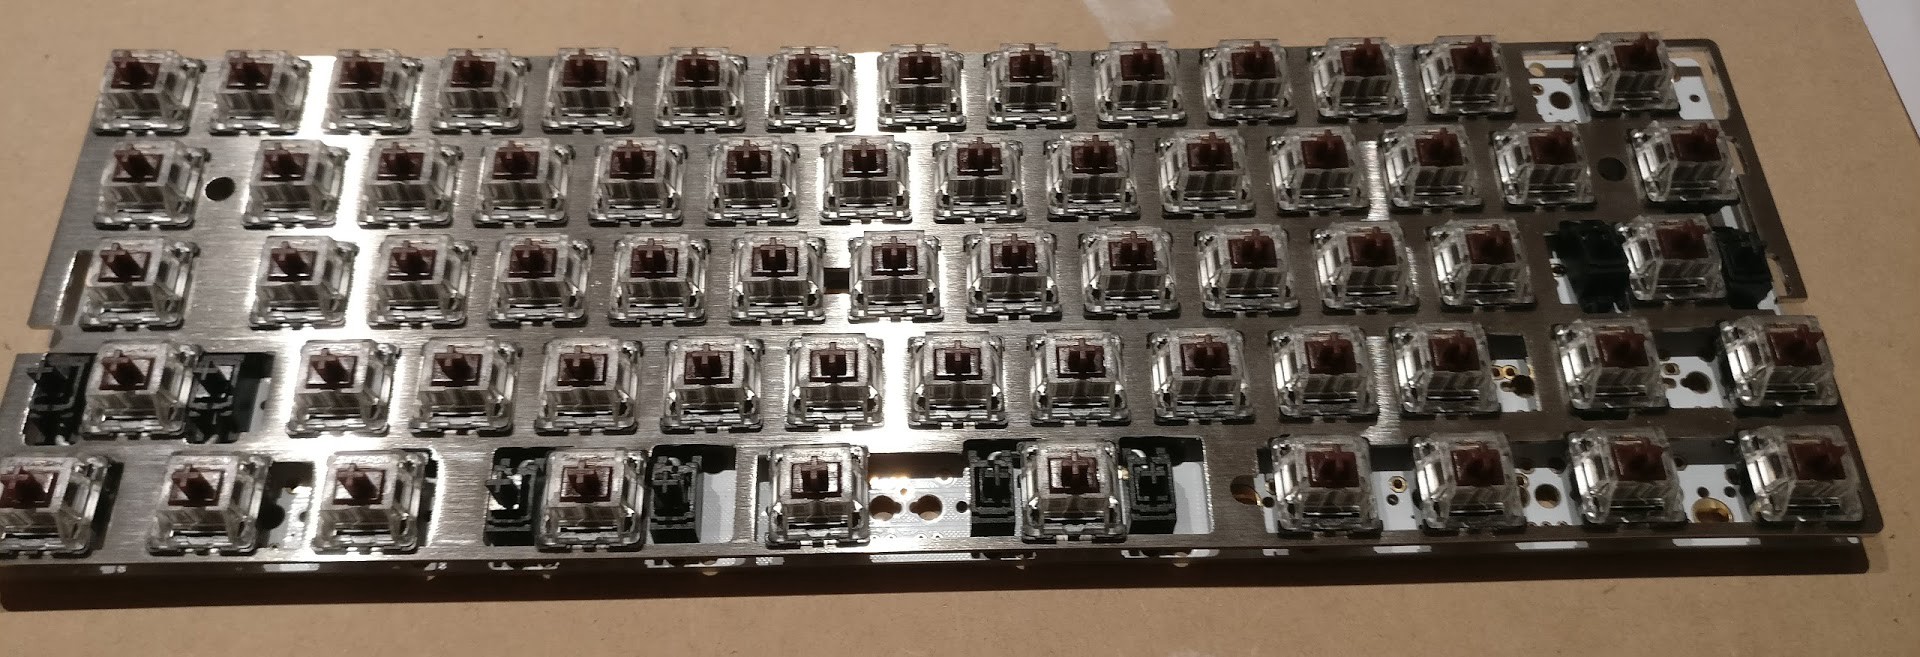
As I was putting on my keycaps, I realised that some of the right-most keys on the bottom row couldn't all fit together on at once. As it turns out, despite having testing my layout earlier, I still managed to solder two of my switches into the incorrect spots!
Specifically, I'd placed the 2nd and 3rd switches from the right just a little too far left, like so:
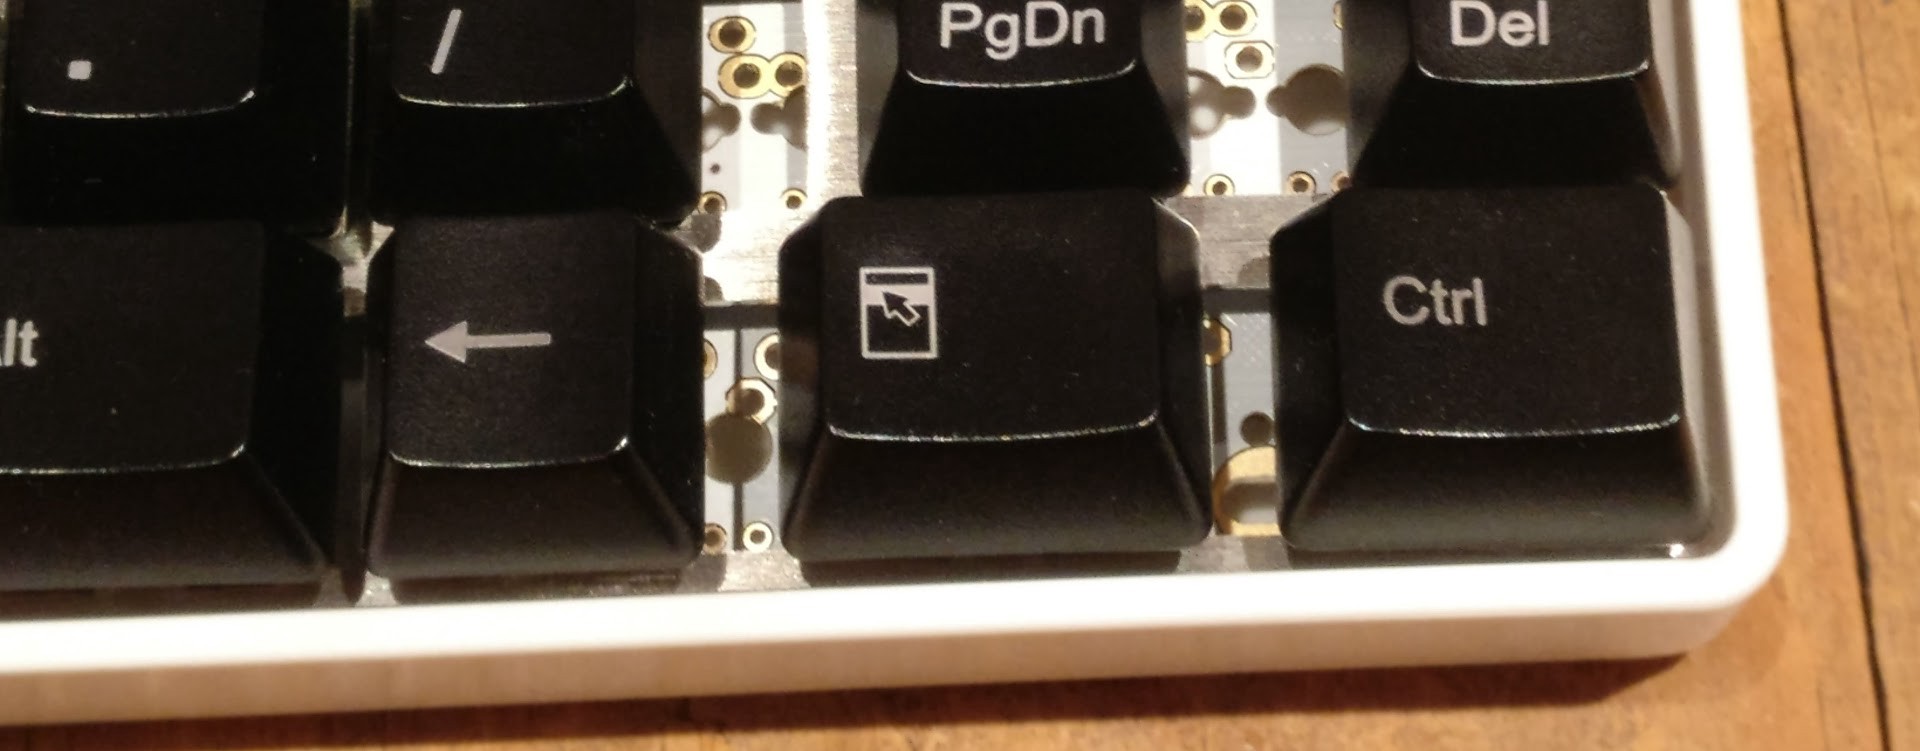
The only way to fix it was to desolder those two switches and re-solder them into the correct positions. Since this was my first time desoldering anything as well, I had some trouble getting all of the solder off with my weak solder sucker, but with a fair bit of patience and carefully prying out the switches, I was able to get them soldered into their correct positions without any drama.
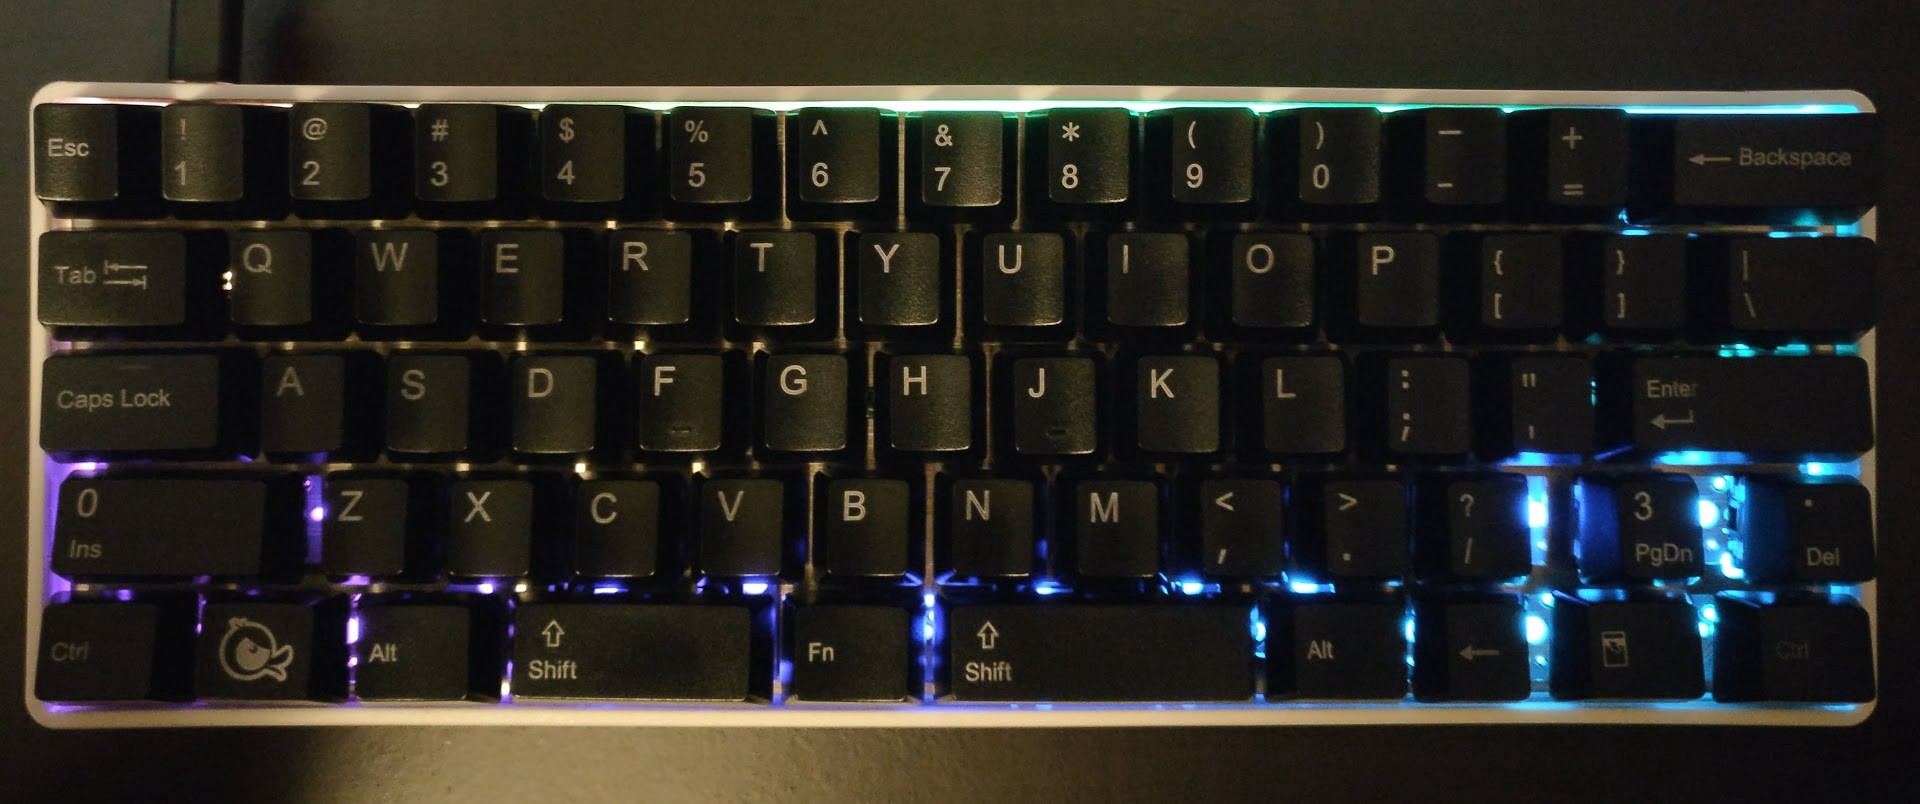
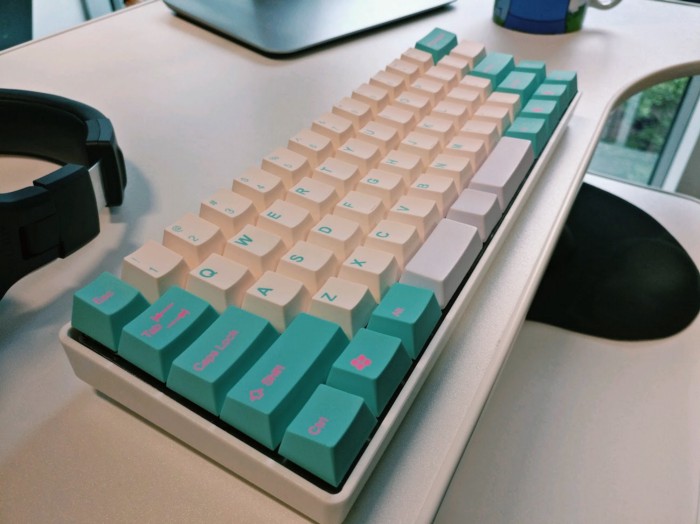
(Although using temporary keycaps made the end result feel a bit underwhelming, it all paid off when my real keycaps did finally come, revealing the lovely creation pictured at the top of this post)
9. Programming the layout
Depending on what layout you want, this may not be at all necessary - the PCB should come pre-configured with a standard default layout. However, to really make good use of the split spacebar I had set up, I had to design a layout myself!
When it comes to programming your layout, there is the option of literally opening up C source files to make all the customisations you want to the microcontroller that runs your keyboard. Thankfully, though, there are plenty of tools out there that allow you to customise your layout without touching a line of code.
(Honestly, even as a programmer myself, the idea of having to write code for my keyboard still sounds like a major pain!)
To create my custom layout, all I had to do was go to http://qmkeyboard.cn/ and select the preset layout that applied to my DZ60 PCB:
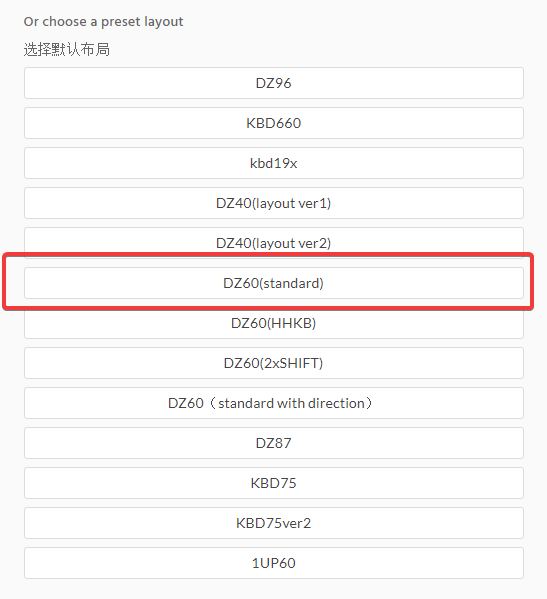
From there, I could make any modifications I like, without having to redo the entire keyboard layout just so I could change a couple of keys.
In particular, I made the center of my split spacebar a Function key, and added a bunch of commonly-used keys to the Function layer, in whatever spot I felt would be convenient. I also added some extra convenience keys like volume up/down since none of those functions come in the default DZ60 layout.
If you're interested in seeing all the details of the layout, I uploaded the full layout file for use in qmkeyboard here.
Once I had the layout right, I downloaded the .hex file that qmkeyboard generates - this is the file that can be flashed onto your keyboard's microcontroller to use the new layout.
To actually flash the .hex file to the keyboard, I had to do a couple of things:
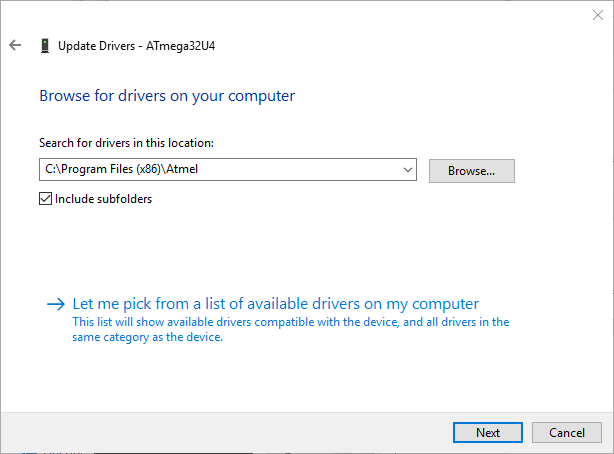
- First, I ensured that my computer had the correct drivers for the DZ60's ATmega32u4 microcontroller by installing ATMEL Flip. When Resetting the keyboard (described just below), Windows would recognise the device but wouldn't have the correct drivers to use it correctly; I used Device Manager to run "Update Driver" for the device, pointing it to the drivers provided by Flip:
- I downloaded and opened QMK Toolbox, selecting the .hex file I downloaded from qmkeyboard:
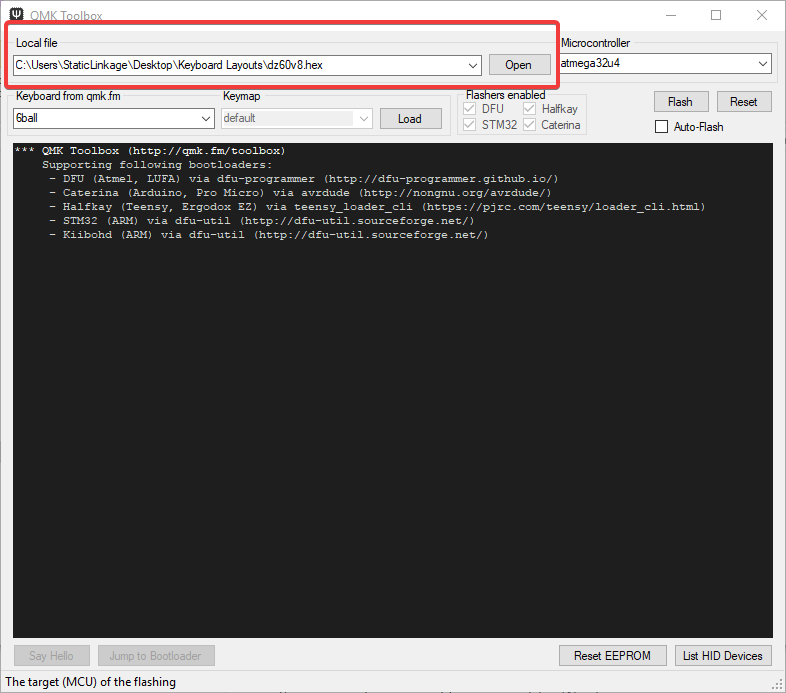
-
Press Function1 (the second key from the left on the bottom row) + '' on the keyboard to Reset it (which puts it into a state where it won't register keypresses, but in which you will actually be able to flash it)
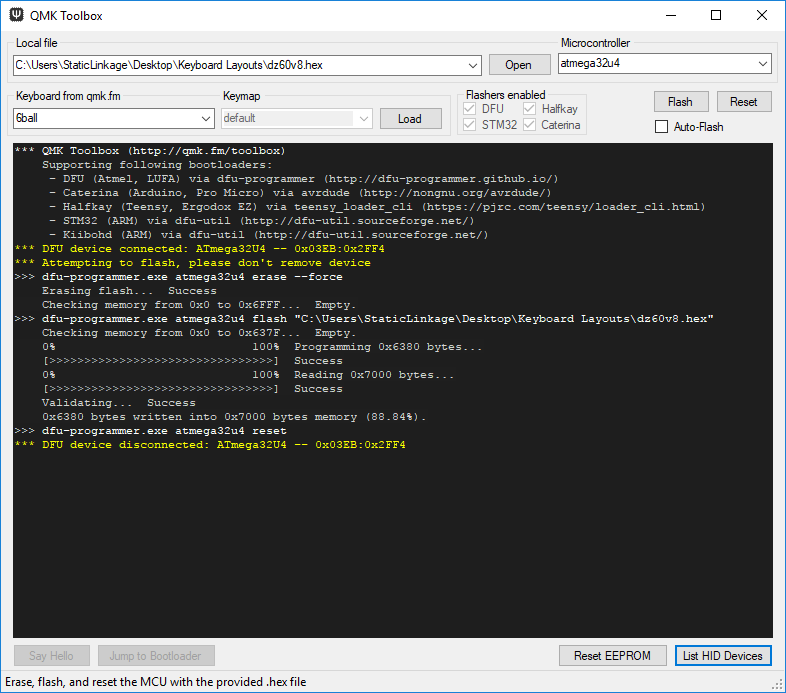
-
Once the device shows up in QMK Toolbox (indicated by the yellow messages), I just had to hit the Flash button, which will update the keyboard's microcontroller and restart it so that you can start using your keyboard again
With all that done, my keyboard was finally using my own custom layout! Although it might sound quite tedious, once I had the process set up, I was able to repeatedly make small updates to my layout as I went, and update the keyboard each time quite quickly.
All in all, it felt quite liberating to be able to customise my keyboard any way I want, as every couple of days I would realise something I'd like to change! It's also nice feeling like the layout is truly my own as I continually tweak it along the way.
The Typing Experience
With the entire build process said and done, I couldn't wait to actually finally use my new keyboard!
Having only used Cherry Blue switches before, I was especially keen to see how the Gateron Browns compared. Naturally, the first thing I noticed was the difference in sound - the lack of 'click' sound in the Browns is much more suited to my fairly quiet room at home. The sound of the keycaps being pressed down against the plate is still very audible, but it's a more subtle (yet still satisfying) 'thock' sound, which is also due in part to the plastic case.
In terms of the typing feel, so far I think the Browns feel just as nice to type on as the Blues. The lack of click hasn't impacted my typing accuracy (as far as I can tell), and the tactility is just as good (though I have also never used a non-tactile switch to compare it to). If anything, the overall combination of sound and feel makes this keyboard a little nicer to type on than my work keyboard - though that might be enhanced by the novelty and excitement of the new keyboard versus the old one.
The other important thing to adjust to has been my custom key layout itself. I use the arrow keys quite a lot (especially when programming), so I was worried that the lack of dedicated arrow keys would give me grief. In the end, although it definitely did take some getting used to, I found the key-combinations of Fn+WASD replacing the arrow keys to be quite effective. I still sometimes have to think a bit harder when performing actions involving keys, but I think it's just a matter of time before it all becomes second nature.
As a matter of fact, the overall usage of Function-key combinations to replace keys that aren't immediately available on the keyboard (like F1-F12, Delete, Page Down/Up, Volume Down/Up, Print Screen, End, etc.) has really grown on me, mainly because it significantly reduces hand travel when typing. I no longer need to move my hands around the keyboard to access the arrow keys, and I can perform more actions with one hand than I could on a regular full-size keyboard. Having to remember all the key combinations for different keys is also usually not an issue, since I set up most of the layout myself.
All in all, I really enjoy typing on this keyboard with this layout. It may seem small, but it adds a little bit of fun and excitement to the otherwise common activity of typing. In fact, half the reason I wanted to write this post was so that I could give the keyboard a good exercise!
One last thing: while I was writing this article, the cheap set of PBT keycaps that I originally ordered finally arrived, which provides me with another nice photo to close off with:
So, there you have it. I'm really glad I decided to build my own keyboard, and I look forward to customising it further in the future (and probably building some other keyboards as well). If you've liked the sound of it, you should give it a shot too! With some research and planning, it really is a fun and rewarding project.